A few months ago we launched the Items Anywhere feature in Backpack. This allowed you to move content anywhere on the page. You could have a file then a to-do list then a note then another to-do list, etc.
Good, but…
People loved this new functionality, but it introduced some new behavior into Backpack that turned out to be more frustrating than we thought. The issue was this: As part of the new Items Anywhere feature, you had to add new content from the top of the screen. You could move anything anywhere you liked, but it had to be added at the top first. Then you could move it somewhere else. This made adding and positioning a two-step process. Annoying, yes.
So now what?
We started brainstorming, sketching, and considering some options. How could we keep the Items Anywhere feature but also allow you to add content anywhere? How could we do this without making things more complicated or without adding a lot of interface overhead?
First idea: Add from the bottom too
We had a fair number of requests from people who didn’t mind adding content at the top of the screen, but they also wanted to add content to the bottom of the screen. This seemed like a reasonable request, but it didn’t solve the more common problem: How to add content to the middle of a page. Adding content to the top or bottom still required you to move the content after you created it. So we passed on that solution.
Eureka in a chat
I pinged Sam regarding this “widgets to add content under a page separator” feature we’d been loosely discussing. We tossed around a couple of options: Adding content from a divider and adding content anywhere via a hover in the gutter between items. Sam’s “add anywhere via a hover in the gutter” concept seemed like the best idea, but we tried the divider option first since it was the easiest (“Judo”). Here’s the chat transcript:
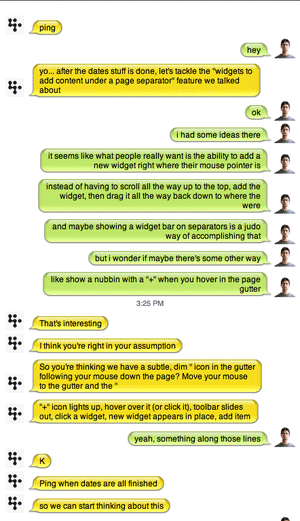
I’m on the left, Sam is on the right
Second idea: Using dividers
New in the Items Anywhere release were page dividers. Page dividers let you divide a page into different labeled segments. They felt like a natural fit for adding content anywhere on the page. If you wanted to keep your notes together and your to-dos together and your files together you could just create page dividers and then add new content directly to those sections.
So we got real and mocked up a couple versions of this:
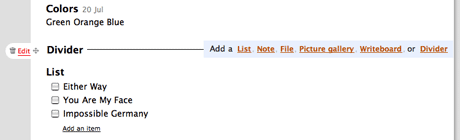
This was a version that revealed the add content links when you hovered over a divider.
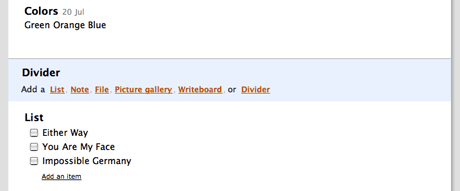
This was a version that always displayed the add content links below the divider.
We weren’t happy with either of these solutions. First, it required you to add a divider. If you wanted to add content in a lot of places your page would be littered with dividers. Second, it just didn’t feel right. The feature was hidden behind a hover on another feature. It wasn’t discoverable enough. It was too much to ask.
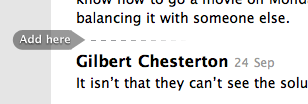
Third and final idea: Add Here
After dismissing the add-via-divider idea, we moved on to the “add anywhere via a hover in the gutter” idea. We quickly mocked it up:
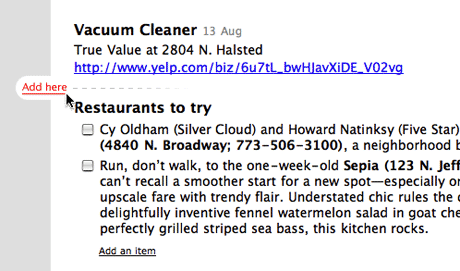
We liked it. A lot. It felt right, it made sense, it solved a couple of problems at once. Then we started thinking about where the hover target would be. How would someone initiate the feature?
Mousing over the red area would flip on the hover.
Sam got to work hooking up the Javascript and Rails code to make it work. Then we polished it up so it looked nice:
Watch this Quicktime movie to see it in action.
So far the feedback has been great. We’ve gotten plenty of feedback via email too. We’re really happy with the solution and are thrilled to see our customers are too.
If you haven’t tried Backpack maybe it’s time to give it a shot. Or, if you tried it before maybe it’s time to try it again. It’s gotten a lot better. Thanks!
Eric
on 17 Oct 07I’m always impressed by the amount of thought you guys put into the design of each new feature.
One small question/gripe… Any reason you chose not to have the hover area (the red area in your screen shot) extend further to the left?
Once I saw the “Add here”, I kinda expected I could show it again by hovering over where the word “Add” had been previously visible.
Anon
on 17 Oct 07Thanks for the design decision post. I love you guys to death. A huge reason why I started paying attention to you guys in the first place was about “design decisions”, and it seems like it’s tapered off a bit. I love Getting Real in book form and all the bits you’ve had on the blog, but it seems a bit like everyone who’s paid attention to this blog for a year or so or bought the book, has got most of the “do less” metaphors and advice burned into their heads already. It’s always good advice and I’m sure newcomers are learning something, but your long die hard fans might be getting a little bored? I’m still your biggest fan!
I know it was a “long time ago” but I miss the one page redesign examples you guys used to do for other sites. Any chance you could do something like this again, maybe just tackle one element of some popular or not so popular site out there for some of your blog posts.
Joshua Rudd
on 17 Oct 07Anyone else find it strange that Eric and Sam didn’t use Campfire to chat?
Joshua Rudd
on 17 Oct 07Or, Jason and Sam, that is… not enough coffee in the world this morning.
JF
on 17 Oct 07Joshua, we use Campfire all day every day, but sometimes when we want to have a quick one-on-one or have a conversation that doesn’t add value to the current Campfire discussion we’ll jump into IM.
Fjölnir Asgeirsson
on 17 Oct 07How come you decided to use the safari link-drag look on the add here tab instead of the tab appearance you already have?
Joshua Rudd
on 17 Oct 07Just being a bit snarky, Jason. ;) I love Campfire and the rest of your services – and use them all day every day, too (well, except Campfire – it’s still been difficult getting others to incorporate it into their work-flow).
This latest update to Backpack is especially time-saving.
RS
on 17 Oct 07It had to do with assumptions in the code we already built for positioning elements on the page and triggering their hover states. By keeping the constrained hover area, we were able to build upon the foundation of code we already had for triggering the “Edit” nubbins. It was better to compromise on that point than to go back and revise all the code for every hoverable item on the page.
jake
on 17 Oct 07immediate dunce cap for anyone who asks why they aren’t using campfire
Raymond Brigleb
on 17 Oct 07judo: (noun) a sport of unarmed combat derived from jujitsu and intended to train the body and mind. It involves using holds and leverage to unbalance the opponent.
Inigo Montoya: “You keep using that word. I do not think it means what you think it means.”
RS
on 17 Oct 07Sam came up with the new look. At first I thought it would be better to “be consistent” and follow the nubbin style we already had. Now I’m glad we used different styles.
If the nubbins looked the same, then it might be hard to tell which nubbin you triggered when your mouse is on the border between an existing widget and the empty space above or below it. With the new design, these different nubbins with different actions and different goals … they look different. It means you can build a stronger “muscle memory”, and tell at 10,000 ft that you’ve triggered the right nubbin before moving in for the precision click.
Judo
on 17 Oct 07Not some more people having a problem with the word judo!
Henrik Lied
on 17 Oct 07The one thing I’m curious about is how you guys store the information in the database. Is it a weird relational table, or is the data denormalized?
If denormalized, how is the different sections divided?
I’d like to see a more technical version of “Design Decisions”, since the work you are doing is truly an inspiration to a lot of us.
Thanks, Henrik
Shane
on 17 Oct 07Absolutely amazing! I love the work you guys do. It is refreshing and inspiring to see such an ostensibly simple product having so much effort, talent and thought behind it. I am continually in awe.
Baeck
on 17 Oct 07I hereby award Sam 2 points for his usage of the word “nubbin’”. The world would be a better place if there were more nubbins!
John-Henry
on 17 Oct 07That is a very useful new feature, and a fascinating description of how you got there. I really like your software, and as a total newbie to interface and software design, who comes from a (newspaper) print design background, find your approach inspiring and elegant.
I have one request, as a user of tadalist (looking forward to iPhone coming to UK so I can have a good mobile to do list) and of backpack, I would love it if backpack knew what tadalist was listing – and v.v. It just feels a bit strange to have this to do list floating free, unrelated to the project planner/etc that is backpack.
Is there a way to have tadalist mirrored in backpack?
keep up the great work
todd
on 17 Oct 07Interesting post and great feature! Love to see some of these UI enhancements make their way across the product line (to Basecamp for instance). However, while most 37signals stuff works great on my iPhone, the new backpack “Add anywhere” feature doesn’t work very well since there is no mouse pointer input in the iPhone (or most mobile devices it seems… blackberry too). You can’t win them all I guess, but any chance we’ll see mobile-safe versions of Backpack for when you are out and about (like ta-da list)!?
Zack
on 17 Oct 07That’s definitely a great new feature! I’ve never used Backpack, but after watching that Quicktime movie, I think I might have to take it for a spin.
It looks utterly simple :).
JB
on 20 Oct 07This feature’s design is simply brilliant! At first I thought that it wouldn’t be easy to fire the add here, but not, everything fits into place nicely. That’s design. Period.
Roope Rainisto
on 22 Oct 07Although this applies here very well, this is also more of a general nature question: Thinking of current mobile browsers (iPhone, N800 etc.) and especially future browsers – touch screen mobile browsers are developing very quickly – and the fact that there is no cursor available to perform UI operations like this, how do you see features and UI designs like this being done in the future? Or would you consider creating a separate version for those devices?
This discussion is closed.