You’re reading Signal v. Noise, a publication about the web by Basecamp since 1999. Happy !

Signal v. Noise: Design

Our Most Recent Posts on Design

Twitter's UX: Separate the hits from the geekhacks

Ryan
Ryan wrote this on 27 comments

Twitter nailed a few important things in their user experience compared to alternatives like Facebook. Posts are public by default, so there aren’t debates or surprises about privacy. Streams are built out of subscriptions (“following”), not “friendship”—a word that loses meaning when your friends are 500 strangers. And the 140 char limit gives the stream of updates a distinctive rhythm.

But some serious flaws are holding Twitter’s usability back. A collection of hacks that were initially cool and clever among the geekset have turned into de facto features. Why should users have to know what a URL shortener is? Why does attaching a photo to a tweet require third-party tools and diminish your character count?

Twitter’s recent redesign doesn’t address these fundamental user experience problems. Twitter would be easier to use, easier to explain, and easier to expand if they focused on their hits. Following is better than friendship. Public by default is better than public-by-surprise. 140 chars keeps things sharp and rhythmic. A true redesign would separate these genuine insights from the clever geekhacks and make Twitter simpler to use and easier to understand.

Behind the scenes: Customer Wall

Jamie
Jamie wrote this on 21 comments

The idea
Jason Fried sent me a text Saturday morning a few weeks ago: “Pumped about an idea for a ‘meet our customers’ page. In on Monday??”

The idea, I learned Monday, was pretty cool. First we’d ask customers (on our blog and on Twitter) to send in photos of themselves. These photos would be printed out and pinned to a Customer Wall in our new office — an entire wall covered with the smiling faces of our customers. Then we’d create a page on our website that would simulate this office Customer Wall for everyone to see. Within 5 minutes of our discussion, Jason asked customers on the blog to send their photos and bios to me. The photos and bios started arriving immediately. I started designing.

Design and production
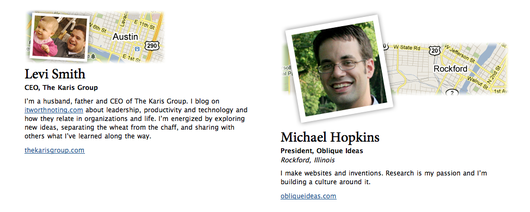
The design of the Customer Wall page is pretty simple. There are only 3 real elements: a photo, a map, and a block of copy.

Making sure that the balance and proportions were right was the tricky part. I used real customer photos and bios for my designs as the emails started coming in. Here are all of my iterations of the customer bio design. Some of the changes from iteration to iteration are seemingly minor, but extremely important for arriving at a tight page layout.

#1 and #2

The first challenge was determining the size of the photo in relation to the size of the map. Some customers submitted long copy and others short copy. Clearly #1’s photo and map were too small based on the copy that was submitted. Here experimented with making the map do a little more work by not spelling out the city and state within the copy. #2’s photo was much too large and the map seemed arbitrarily placed. There was also a huge gap between the imagery and the copy. It all feels too disconnected.

#3 and #4

I thought that I could just set the map at a constant height and the copy could be edited to fit. I attempted this in #3. The photo and the copy seemed to align perfectly. However the map felt like an afterthought. #4’s balance started to feel better. The copy was close to the map. The image size felt right in proportion to the map size.

The problem

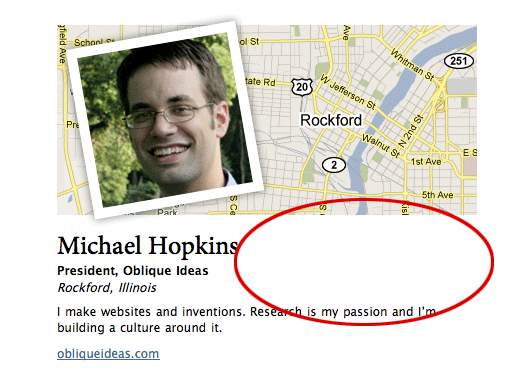
Jason’s feedback, however, was that there was still too much whitespace (illustrated by the red oval above). It is true that some people have longer names, so some of that whitespace was necessary. However there must be a way to tighten up that area.

The solution

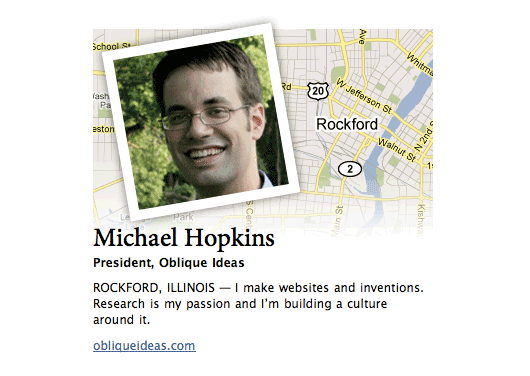
To shrink the whitespace I reduced the width of the customer bio block by about 100 pixels. I also faded the map background slightly into the customer’s name so that the whitespace felt shorter. Jason also had the great idea of treating the “city, state, country” like a newspaper article. That saved another line. For the final design we even cut out the website link and made the customer’s company name clickable.

Great results
Seeing the Customer Wall come to life has been a blast. It is a great reminder that people all over the world — from our hometown Chicago to Beijing, China to Manchester, UK to Commerce Township, Michigan — depend on our products.

I’ll be adding new customers each week. We’d love to have you on our customer wall! Send us your name, title, company, location, a brief description about what you do, and a list of 37signals products you use — along with a photo — to [email protected] with the subject “Customer Wall.”

©2010 Google, Map data ©2010 Google, Tele Atlas

[Screens Around Town] Cognition, Erskine Design, Monoprice, and Axis Maps

Basecamp
Basecamp wrote this on 1 comment

Cognition
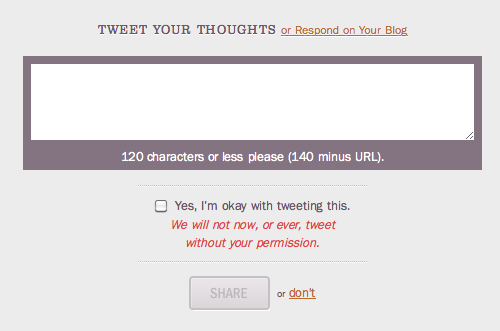
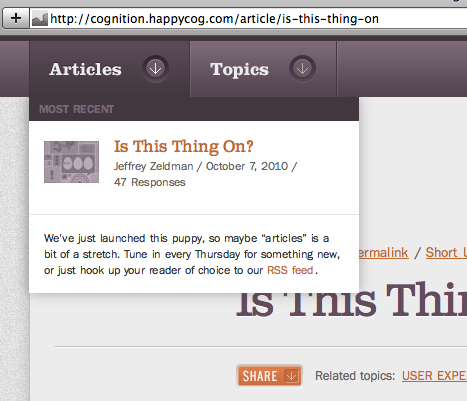
tweet Cognition (Happy Cog’s blog) lets you use Twitter to leave comments.

dropdown
And the dropdowns there are nicely designed too.

Erskine Design
ed
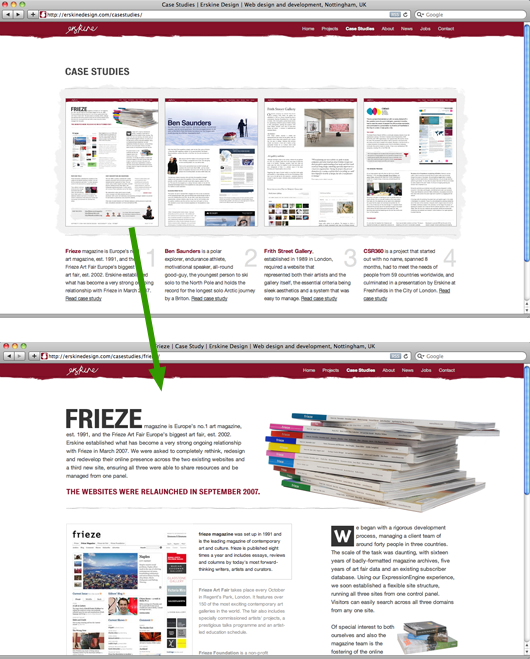
Erskine Design’s case studies page has thumbnails of each case study page on its own website. Those thumbnails aren’t website designs, they are the actual case study pages shrunken down. It’s like you can see all their pages from far away and then you click on one to see it up close.

Monoprice
monoprice
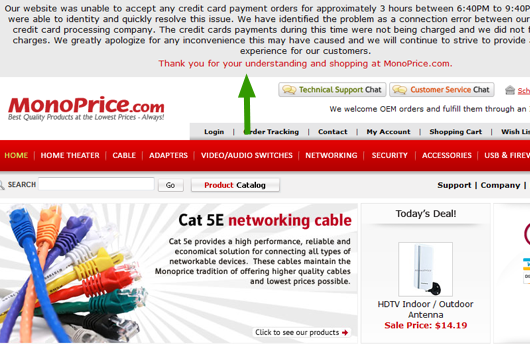
SvN reader Jonathan Sato wrote in about this alert message on the Monoprice home page.

I thought this was a nice way of owning up to a problem. A description of the site error is displayed at the top of the homepage to all visitors.

Although I wasn’t affected by the error, in a strange way it actually gives me more confidence in buying from this company online.

Typographic Map
map
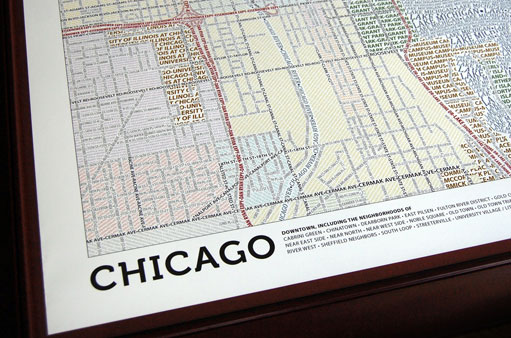
Typographic Map of Chicago.

These unique maps accurately depict the streets and highways, parks, neighborhoods, coastlines, and physical features of the city using nothing but type. Only by manually weaving together thousands upon thousands of carefully placed words does the full picture of the city emerge. Every single piece of type was manually placed, a process that took hundreds of hours to complete for each map.

We just ordered one for the office.

Customizing web forms with CSS3 and WebKit

Jason Z.
Jason Z. wrote this on 32 comments

Last week, we shared a few things we’d learned about UI in mobile WebKit browsers. In that post we touched briefly on the idea of using CSS3 to make form inputs that look and feel the same in all WebKit browsers across platforms. Today I’d like to share some specific examples of how we did that.

Getting started

Customizing form elements in WebKit browsers all starts with applying the -webkit-appearance property to all inputs:

input, textarea, select {
   -webkit-appearance: none;
 }
Un-styled inputs
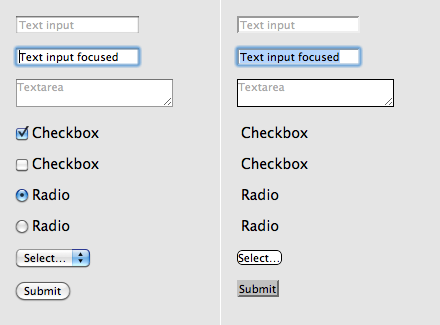
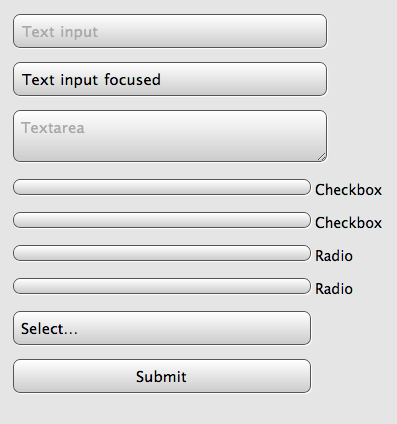
Form inputs in Safari before and after applying -webkit-appearance:none.

This removes all of the browser’s default styling from the inputs. You can then apply your own CSS styles.

Base styles

I started by adding some basic styles that would be common to all inputs:

input, textarea, select {
   border: 1px solid #555;
   padding: 0.5em;
   font-size: 15px;
   line-height: 1.2em;
   width: 80%;
   background: #fff;
   background: -webkit-gradient(linear, left top, left bottom, from(#fff), to(#ccc));
   -webkit-appearance: none;
   -webkit-box-shadow: 1px 1px 1px #fff;
   -webkit-border-radius: 0.5em;
 }
Basic styling example
Base styles

That gives us some consistent treatment (and the checkboxes and radios now are visible again), but we’ll need to address some of these specifically.

Getting specific

Using the [type=] attribute selector in our CSS, we can specify styles for each input by kind. For example here are some addtional styles that will be applied to checkboxes and radios:

input[type=checkbox],
 input[type=radio] {
   display: inline-block;
   font-size: 15px;
   line-height: 1em;
   margin: 0 0.25em 0 0;
   padding: 0;
   width: 1.25em;
   height: 1.25em;
   -webkit-border-radius: 0.25em;
   vertical-align: text-top;
 }

 input[type=radio] {
    -webkit-border-radius: 2em; /* Make radios round */
  }

Our checkboxes and radios are now properly sized. Next, we’ll want to specify how the checkboxes will look when checked. The :checked pseudo-class makes it as easy as applying a background image:

input[type=checkbox]:checked {
   background: url("data:image/png,%89PNG[...]") no-repeat center center;
   -webkit-background-size: 28px 28px; /* shrink high resolution background */
 }
styled checkboxes and radios
Checkboxes and radios in both states

The browser applies and removes the checked attribute as the user clicks the widget, allowing us to style our custom checkboxes without any Javascript.

Custom style

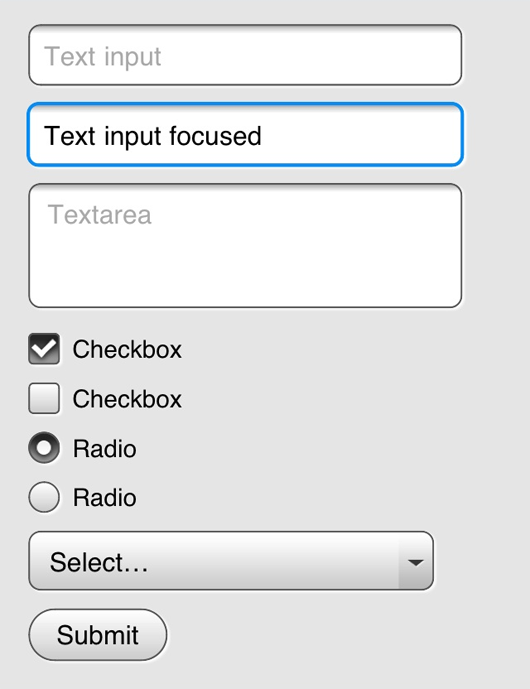
After making some additional styles for textareas, submit buttons, and focused fields, our form now looks something like this:

Final form
Our final customized form viewed with Mobile Safari

The appearance of our form is clear and the inputs are now consistent across a variety of WebKit browsers including Apple Safari, Google Chrome, and mobile browsers on iOS and Android devices. See the example in your browser.

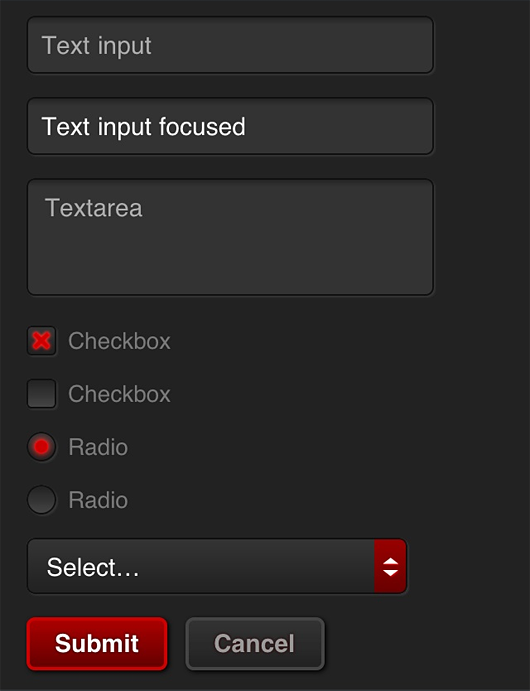
With some simple modifications, we can completly change the look:

Alternate look
An alternate look based on the same code

Working example of this alternate look.

Final thoughts

Certainly, changing the appearance of the default form widgets is not something to be taken lightly. Our approach here was a fairly conservative exploration in standardizing on an input style similar to Mobile Safari as a proof of concept. Radically changing UI that people have become accustomed to in their browser should be avoided unless there are substantial benefits to the user. We considered the case that someday 37signals would want to offer mobile versions of all of our apps. Having a standard set of inputs that feel like us, like the desktop apps that so many people are already used to is definitely a benefit. Regardless of your particular stance, it’s exciting that CSS3 finally gives us these powerful options for customization at all.

Ryan's talk at Future of Web Apps 2010, London

Ryan
Ryan wrote this on 29 comments

I gave this talk at Future of Web Apps in London last week. In this talk I walk through the steps of creating a web app including modeling, sketching, HTML, Photoshop explorations and moving from static mockups to live running code. Each step is illustrated with a real example, including some live sketching and live HTML. I also wanted to give a sense of how we think about apps at 37signals, as a stack of different levels that we can iterate on individually.

Future of Web Apps, by the way, was a really great conference. Impressively well-organized, cool crowd, and plenty of substance. Thanks to Carsonified for inviting me again this year.

Related: Weaving Design and Development

Here’s what we’ve learned about doing UI for mobile web apps with WebKit

Jason Z.
Jason Z. wrote this on 32 comments

Lately, we’ve been exploring ways to offer web apps that perform like native apps on mobile devices. For this short sprint we targeted mobile WebKit browsers—especially the default browsers on iOS and Android—because of their widespread use and excellent support for HTML5 and CSS3.

Here are a few things we’ve learned along the way:

Browser differences

Targeting WebKit browsers specifically lets us make liberal use of -webkit extensions to CSS3 (as seen in the spinner animation we shared recently). Incompatibilities between the current browsers on iOS and Android devices has not been an issue so far.

Fonts

The biggest difference is the default installed fonts. We prefer Lucida Grande for our apps in desktop browsers, but the font isn’t available on any of the mobile devices we tried. iOS offers Verdana, Helvetica or Arial; Android devices have Droid Sans. Just like on the desktop, Verdana is large relative to other fonts. For that reason, we choose Helvetica on iPhone. Compared to Helvetica, Droid Sans appears a bit smaller and more condensed.

Form widgets

Form widgets are another distinct difference between the platforms, but because of the flexibility of WebKit are less of an issue. The native browser widgets on Android are ugly in some cases and unuseable in others.

For example the checkbox widget has a checkmark in both the checked and un-checked states—the checkmark turns green when “checked”. Using CSS we were able to create new widgets that look nearly identical on both platforms. Because of the differences in font rendering, however, it can be difficult to do things like align text inside a button. Web designers should not be surprised by this since it’s a common hassle between even desktop browsers and platforms.
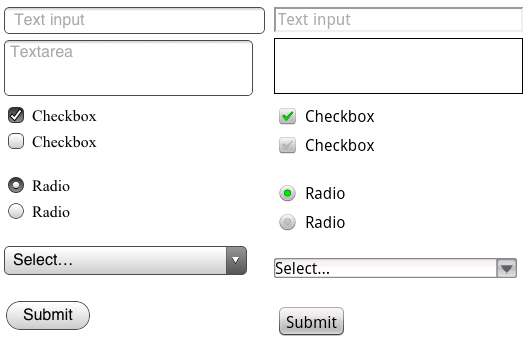

Default form inputs on iOS (left) and Android. Notice how the label on the submit button is positioned differently on each. Or imagine a long list of Android checkboxes where none is “checked”. Are they all checked or un-checked?

Testing

For the purposes of testing your app, both platforms offer desktop simulators. Testing on the iPhone SDK simulator is fast, convenient, and fairly representative of using the actual device—it actually looks like an iPhone.

The iPhone simulator supports the iPad, iPhone and iPhone 4 devices, but only on the latest OS version. Because of this, supporting older versions of Mobile Safari could be a challenge. While it’s possible to run multiple versions of the iPhone SDK, testing on older versions is best done on a physical device.

The Android SDK’s simulator, however, is a sluggish java app launched from the command line that gives no sense of the feel of the OS within the context of the hardware. It does account for the wide array of Android hardware and software versions/features in the wild, but in an obtuse way. You can’t, for example, launch an HTC Droid X profile but instead have to spin up a new virtual device and enter the hardware profile yourself.
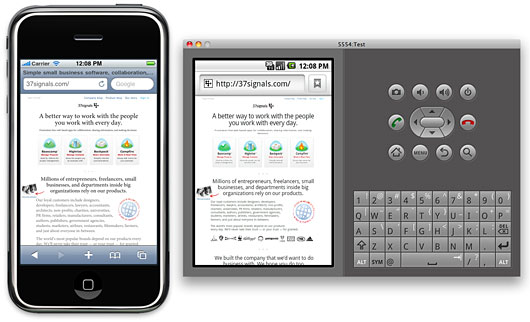

The iPhone and Android simulators running side-by-side. Click the image to see it larger

In fact, all testing is best done on real hardware. The simulators give a poor sense of the app on the actual devices. This is especially true in terms of scale. The much smaller pixel size on desktop computers means the simulated devices appear much larger than you’d expect on your computer screen. Much larger than the actual device. Type that looks great on the device can look horsey on the desktop.

For this reason we’ve also been testing on real phones. Using Dnsmasq we can serve requests for the app on our development machines to devices via a wifi network. Touching the UI is an important distinction from the desktop simulator. Real devices are also particularly useful for previewing on the iPhone 4’s retina display. And a real Nexus One is much faster than the simulated Adroid device.

Screen resolution

The iPhone’s retina display also revealed some additional challenges. Web pages in Mobile Safari on iPhone 4 are scaled at twice the resolution of the earlier iPhone models. This means that images created at 72dpi look fuzzy on iPhone 4 where they are zoomed to twice their size.

Fortunately, -webkit browser extensions to CSS handle this scenario well. Images in CSS targeted at Mobile Safari should be designed at exactly twice the intended display size. So a 16px x 16px icon rendered as a CSS background image should be built in Photoshop at 32px x 32px. Then, we can tell the browser the intended display size using the -webkit-background-size property like this:

background: url(images/icon_retina.png) no-repeat;
-webkit-background-size: 16px 16px;

That displays a high resolution image for iPhone 4 when it doubles the dimensions, and a shrunken version for the lower resolution devices. This appears to work similarly on Android though we haven’t tested a wide range of resolutions. We’ve used the convention of naming images that require this special handling with “_retina” in the file name.

Web app settings

We also explored the apple-mobile-web-app-capable settings which lets apps that are bookmarked to the home screen on iOS act more like native apps. These settings let you specify a loading screen image, allow for local caching of data (even the entire app), and hide the browser chrome. Unfortunately nothing like this yet exists on the Android platform, but it’s a great step for browser-based apps so hopefully the idea will catch on.

Final thoughts

Despite opinions to the contrary, mobile web apps still feel like an excellent opportunity to offer native-like performance without having to specialize in a particular platform, or be subject to the whims of an overlord.

Browser-based mobile apps clearly have the potential to offer user experience that is on-par with native apps. Of course designing that kind of experience is going to require more than emerging mark-up and style techniques—it’s not going to be enough to just serve a mobile stylesheet for your app. Offering a native-worthy mobile experience requires you to rethink the UI of your app and deliver it within an environment where touch is the rule. A big part of this exploration not covered here considered fast page rendering, touch interaction, and local asset storage. We hope to share some of the tech side in another post.

Interview from Prague with Ryan. He discusses the creation of Basecamp, how designers/programmers at 37signals work together, where inspiration comes from, and more.

Basecamp on Oct 5 2010 4 comments

Redesigned: The new 37signals.com

Jason Fried
Jason Fried wrote this on 102 comments

This weekend we launched a redesign of 37signals.com.

We try to redesign 37signals.com at least once or twice a year. It’s not a stated goal, but it’s something we just like to do to keep things fresh — especially since our designs are often copied pretty quickly after we launch anything new.

This time around we wanted to go back to our roots. Our roots included simple, sparse, mostly text-based black and white designs. Our original site, which is now the 37signals Manifesto is the best example of this style. This design from 2002 is another example. Strong opinionated writing was also part of these early designs. It was time to return to that era.

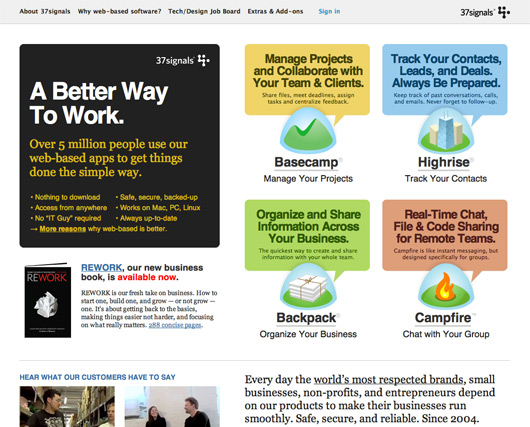
Our previous home page design looked like this:

It was a bold departure from our earlier designs. Full of color, shapes, and pretty dense newspaper-like columns of text. I still like the design, and it served us quite well, but in some ways just didn’t feel like 37signals.

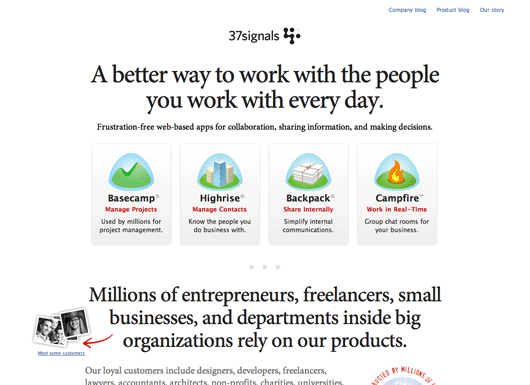
The goal for this redesign was to get back to being absolutely clear about what we do, what we offer, and what we believe in. A big part of that would be the straightforward presentation. Black, white, red, centered, big text, great writing, color for naturally colorful things like product icons instead of color for shape.

We also wanted to bring a bit of the manifesto back to the 37signals home page. Our strong opinions and vision for software and business are a key part of our company. We wanted to make sure some of these ideas were front and center.

A couple of weeks ago we began exploring some new designs for 37signals.com. We’ll share those iterations in a future post. We’ll also be sharing some of the copywriting process for the headlines and paragraphs that ended up on the home page.

The new design

The final design we came up with was a simple, straightforward approach. Big centered headlines, clear blocked sections (one for the products, one for our customers, one for our ideas, one for REWORK, etc). Tight copy, clear lists, and a few small visual flares to highlight key points we want to make. We used color to make a point, not to make a statement.

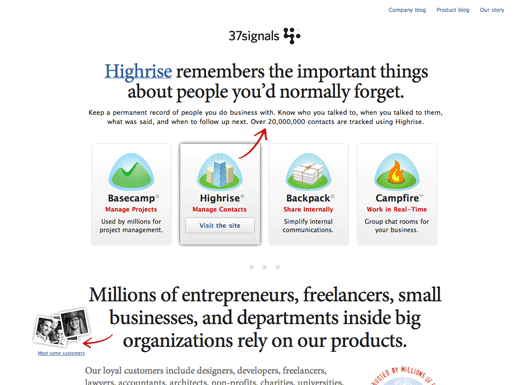
The only thing that’s a bit fancy on the page is revealing a more detailed description of a product when you hover over the product’s icon. On hover we switch out the main headline on the page with the product-specific headline. We also add a red arrow to make sure the connection between new headline and product is absolutely clear.

The whole new design is live at 37signals.com. The new design also introduces our new customer page with faces, locations, and stories from some of our customers around the world.

We hope you like the new design. Thanks for listening.